Hi there...
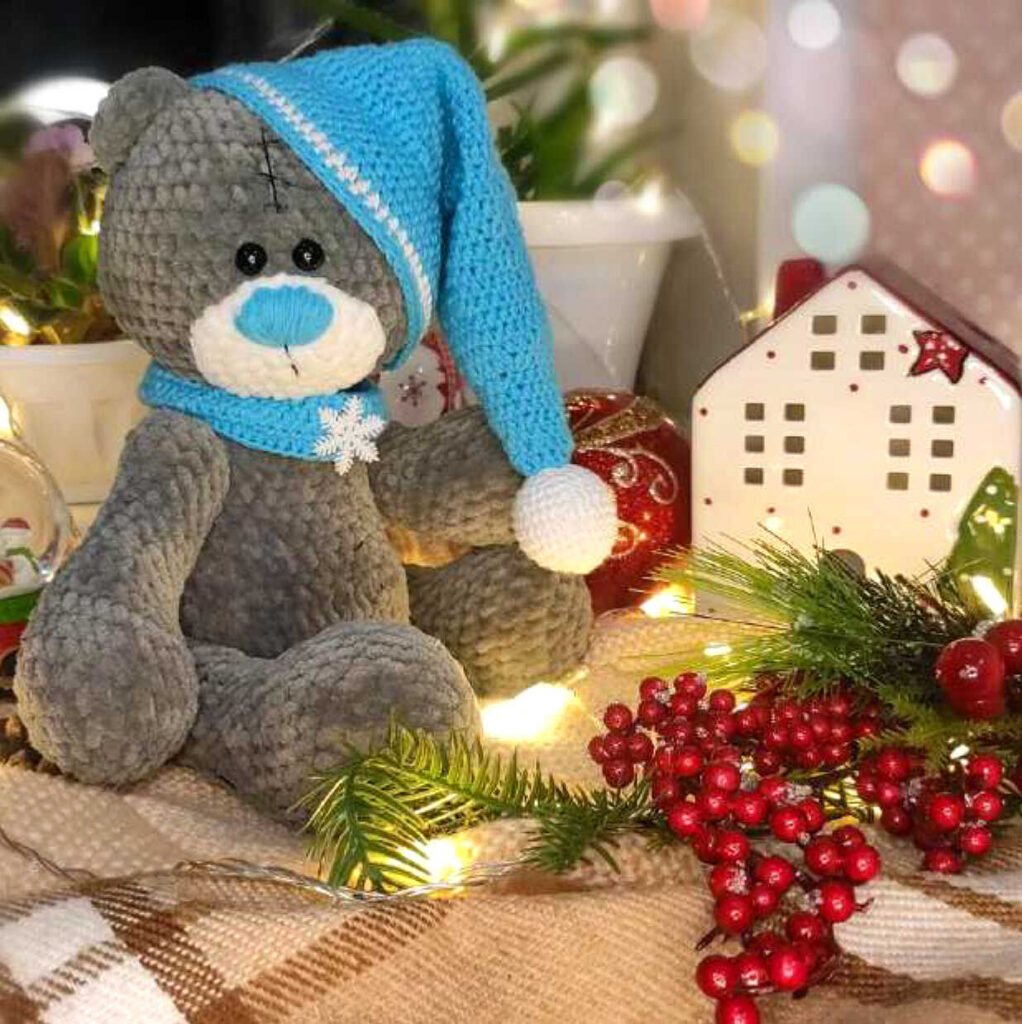
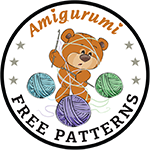
One of the free amigurumi crochet patterns we will share today is the amigurumi bear, whose photos and design belong to Aleksandra Egorova. You can learn how to crochet these bear using the free amigurumi pattern. Thanks to Aleksandra Egorova (@masterskayapodarkov1) for this cute bear.
If you don’t know how to often crochet and needles, read our shares. Start your knitting according to the rate you have according to the shape you will make. Shape your toy by increasing and decreasing the point. Once you weave the shape you want to fill the inside of your toy and look at the pictures to decorate.
Amigurumi cats, amigurumi dolls, amigurumi dogs, amigurumi unicorns, amigurumi lambs, amigurumi dinosaurs, amigurumi foxes, amigurumi bears, amigurumi giraffes, amigurumi pigs, amigurumi penguins, amigurumi panda, amigurumi llama, amigurumi bunny, amigurumi clowns, amigurumi elephants, amigurumi hippos, amigurumi monkeys will not be difficult for you…
Materials
1. Himalaya dolphin baby yarn of dark gray color (320) – any shade of gray will do (yarn consumption, indicated by the crochet, 1.5 skeins)
2. Yarn Himalaya dolphin baby – white color (for the muzzle)
3. Yarn YarnArt Jeans: blue color (1 skeins) and white color – for scarf and
cap, gray color – for patches.
4. 3,75 mm hook for a toy
5. 2, 75 mm hook for scarf and cap
6. Stuffing material
7. Joint for toys – 25 mm (for hands and legs) – 4 pieces, 40 mm – 1 pieces (for the neck)
8. Needle and sewing thread. Black sewing thread for decoration.
9. Safety eyes size 9-10 mm
10. Decorative button for scarf (оptional)
Select the size of the eye in proportion to the size of your toy.
The size of the toy will depend on the density of your knitting, the selected yarn and the hook number.
Toy size (when crocheting number 3.75) – 29 cm
Abbreviations
MR – magic ring
sc– single crochet
dc – double crochet
hdc – half double crochet
ch – chain
(1) – number of stitches
inc – increase
dec – decrease
1. – round indication
sl st – slip stitch
* – footnote for additional tips
AMIGURUMI PLUSH BEAR FREE CROCHET PATTERN
Hands
* Marker runs straight in front of the handle, perpendicular to the top
1. 6 sc in MR (6)
2. 6 inc (12)
3. (1 sc, inc) * 6 (18)
4. (2 sc, inc) * 6 (24)
5. – 8. 24 sc (24)
We fill the handles as we knit.
9. 18 sc, 3 dec (21)
10. 3 dec, 9 sc, 3 dec (15)
11. 3 dec, 9 sc (12)
12. – 19. 12 sc (12)
* If you use joints, fill your hands as tightly as possible
20. 6 dec (6)
Insert the joint between 17-18 rows. The leg of the cotter pin comes out on the inside of the handle (see photo).
** If the handles will be knitted, we fill tightly only the beginning of the handles, after row 19 we fold it in half and close the opening with 6sc.
Legs
* Marker goes in front
1. 6 sc in MR (6)
2. 6 inc (12)
3. (1 sc, inc) * 6 (18)
4. (2 sc, inc) * 6 (24)
5. (3 sc, inc) * 6 (30)
6. – 8. 30 sc (30)
* If you use joints, fill your legs as tightly as possible.
Insert the joint between 19-20 rows. The leg of the cotter pin comes out on the inside of the leg of the toy.
** If the legs will be knitted, we fill tightly only the beginning of the legs, after row 21 we fold it in half and close the opening with 6sc.
9. 24 sc, 3 dec (27)
10. 3 dec, 21 sc (24)
11. 18 sc, 3 dec (21)
12. 3 dec, 15 sc (18)
13. – 20. 18 sc (18)
21. (1 sc, dec) * 6 (12)
22. 6 dec (6)
Cut the thread, leaving a long tip. Tighten the remaining loops with a needle and the rest of the thread.
Body
* The marker goes straight behind, perpendicular to the top, if necessary, tie more 1-2 sc and align the beginning of the row.
1. 6 sc in MR (6)
2. 6 inc (12)
3. (1 sc, inc) * 6 (18)
4. (2 sc, inc) * 6 (24)
5. (3 sc, inc) * 6 (30)
6. (4 sc, inc) * 6 (36)
7. (5 sc, inc) * 6 (42)
8. (6 sc, inc)* 6 (48)
9. – 14. 48 sc (48) – For tying in legs see **
We insert the legs between 11 – 12 rows (check in which row the legs will look better for your toy). We fix the joint. The tip of the leg of the joint can be melted with a lighter and slightly flattened for a more secure attachment.
** if the legs will be tied in, then make sure that the marker goes over the body exactly from behind, in the middle of the back, without displacement. If necessary, knit another 1-2 sc and reposition the marker.
For legs in rows 11-12 – 10 sc, 6 sc (knit in the leg), 16 sc, 6 sc (knit in the leg), 10 sc (48)
15. 18 sc, 6 dec, 18 sc (42) – See *****
16. (5 sc, dec) * 6 (36)
17. – 18. 36 sc (36)
19. (4 sc, dec) * 6 (30)
20. – 24. 30 sc (30) For knitting handles see ***
We insert the handles between 21 – 22 rows (check in which row the handles will look better for your toy). We fix the joint. The tip of the joint leg can be melted with a lighter and slightly flattened for a more secure attachment.
*** If the handles will be knitted: in rows 21-23 we knit 5 sc, 6 sc (we knit a handle), 8 sc, 6 sc (we knit a handle), 5 sc (24)
25. (3 sc, dec) * 6 (24)
****if you are going to tie the head, next row, start the head pattern from the 5th row and then knit according to the scheme. But then do not forget that the eyes are inserted in 11-12 rows. Also (without the use of joints) the head can be sewn.
26. (2 sc, dec) * 6 (18)
27. (1 sc, dec) * 6 (12)
Fill as tightly as possible, insert the joint. We knit the decreases to the end, until the base of the joint is closed.
*****To tie the bear (In a dress or skirt), after the 15th row, change the color of the body to the color of the clothes, knit:
16. 36 sc (36)
17. 36 sc (36) (through back loops only)
Further according to the pattern. To give the skirt a shape in the 17th row crochet through front loops only 3 hdc in one loop. Another row of hdc. We tie one more row with simple sc.
Head
1. 6 sc in MR (6)
2. 6 inc (12)
3. (1 sc, inc) * 6 (18)
4. (2 sc, inc) * 6 (24)
5. (3 sc, inc) * 6 (30)
6. (4 sc, inc) * 6 (36)
7. (5 sc, inc) * 6 (42)
8. (6 sc, inc) * 6 (48)
9. (7 sc, inc) * 6 (54)
We put the head on the leg of the joint, in the very center of knitting, closing the joint. Fill as you knit, more tightly.
* * When using a joints or knitting, the beginning of the row goes from the bottom of the head. When sewing on, the opposite is true. Therefore, you need to carefully monitor which row to insert the eyes
10. – 17. 54 sc (54)
We insert the eyes in rows 11-12 (there is a distance of 1 column between the eyes). If the head will be sewn on, we insert the eyes in about 14-15 rows (the beginning of the row from the top).
18. (7 sc, dec) * 6 (48)
19. (6 sc, dec) * 6 (42)
20. (5 sc, dec) * 6 (36)
21. (4 sc, dec) * 6 (30)
22. (3 sc, dec) * 6 (24)
23. (2 sc, dec) * 6 (18)
24. (1 sc, dec) * 6 (12)
25. 6 dec (6)
Cut the thread, leaving a long tip. Using a needle and the remaining thread, close the hole with a needle and the rest of the thread.
Muzzle
White
1. 6 sc in MR (6)
2. 6 inc (12)
3. (1 sc, inc) * 6 (18)
4. (2 sc, inc) * 6 (24)
* so that the muzzle is voluminous, knit another row of 24 sc nd fill it with filler when sewn to the head
Embroider the nose on the muzzle with the same yarn as the cap, regular stitches from bottom to top or vice versa, in several layers for volume.
For convenience, first embroider two stripes to know what size your nose will be. Don’t embroider nose too big.
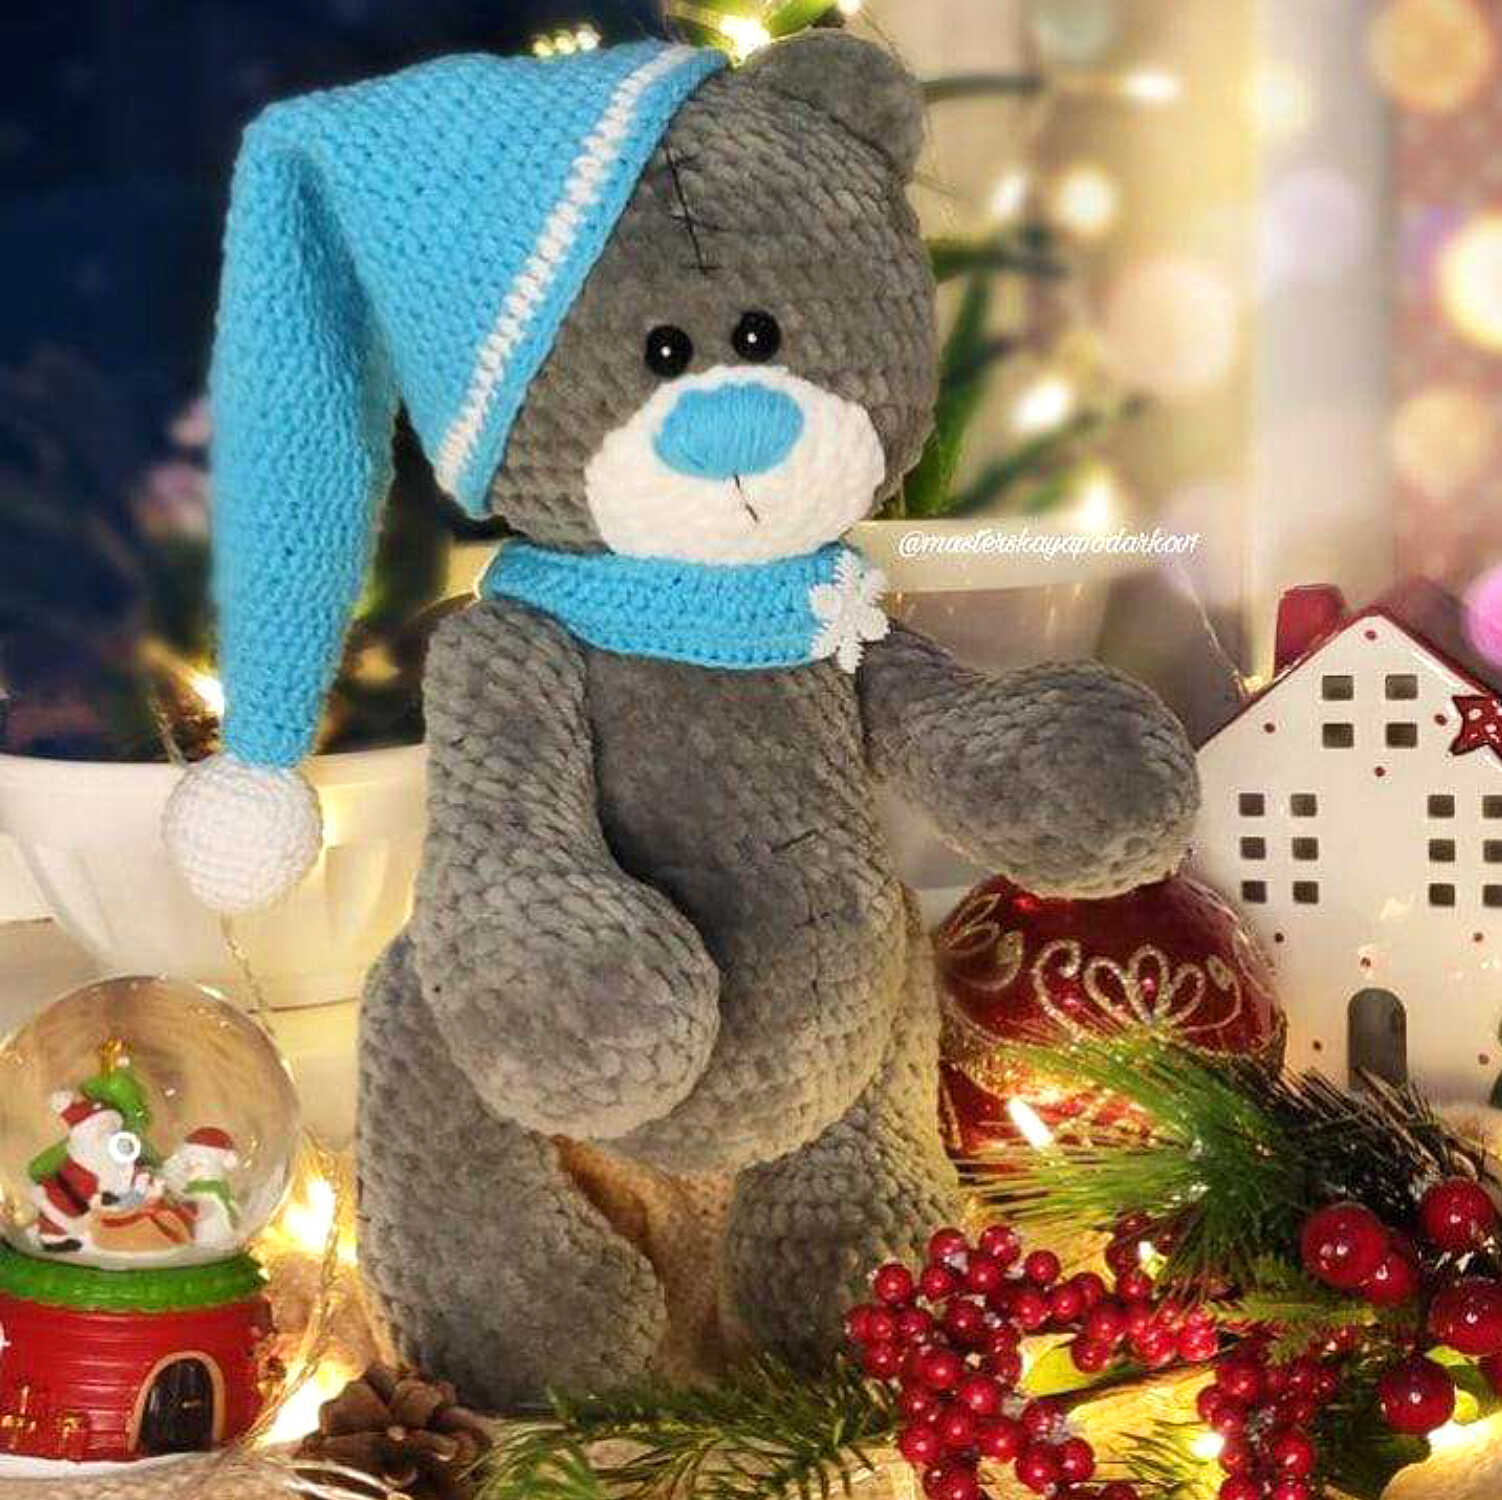
Ears, Tail
1. 6 sc in MR (6)
2. 6 inc (12)
3. – 4. 12 sc (12)
Fold, knit by both sides of knitting 6 sc.
* No need to stuff
Patches
1. 8 sc in MR (8)
Knit (3 sc in 1 loop, 1 sc) * 4, then knit square, in the corners we knit 3 sc.
We choose the size of the patches for the size of your toy.
Cap
* We knit the pompon separately Blue
1. 6 sc in MR (6)
2. 6 inc (12)
3. – 5. 12 sc (12)
6. (1 sc, inc) * 6 (18)
7. – 9. 18 sc (18)
10. (2 sc, inc) * 6 (24)
11. – 13. 24 sc (24)
14. (3 sc, inc) * 6 (30)
15. – 17. 30 sc (30)
18. (4 sc, inc) * 6 (36)
19. – 21. 36 sc (36)

22. (5 sc, inc) * 6 (42)
23. – 25. 42 sc (42)
26. (6 sc, inc) * 6 (48)
27. – 29. 48 sc (48)
30. (7 sc, inc) * 6 (54)
31. – 33. 54 sc (54)
34. (8 sc, inc) * 6 (60)
35. – 37. 60 sc (60)
38. (9 sc, inc) * 6 (66)
39. – 41. 66 sc (66)
42. (10 sc, inc) * 6 (72)
43. 72 sc (72)
White
44. 72 sc (72)
Blue
45. 72 sc
Pompon
White
1. 6 sc in MR (6)
2. 6 inc (12)
3. (1 sc, inc) * 6 (18)
4. (2 sc, inc) * 6 (24)
5. (3 sc, inc) * 6 (30)
6. – 9. 30 sc (30)
7. (3 sc, dec) * 6 (24)
8. (2 sc, dec) * 6 (18)
Fill with filler, sew to cap tip.
Scarf
For a scarf, make a chain of 60 ch, and starting from the second loop from the hook, knit several (3-5) rows in turning rows. We start the next rows with ch1.
* We choose the length of the scarf according to the size of your toy. The larger the ch chain, the longer the scarf
Assembling a toy:
Sew the muzzle right under the eyes (do not stuff). Sew the ears between the 16-22 row of the head (the beginning of the row from the bottom). Sew the tail between about 8-10 row the body.
We embroider stitches on the forehead, tummy, on the sides of the arms and legs. For this we take black sewing threads of 4-6 threads. I do not advise taking too thick threads.
Sew the cap on the side of the head. Sew a decorative button to the scarf.
Your toy is ready!