Hi there...
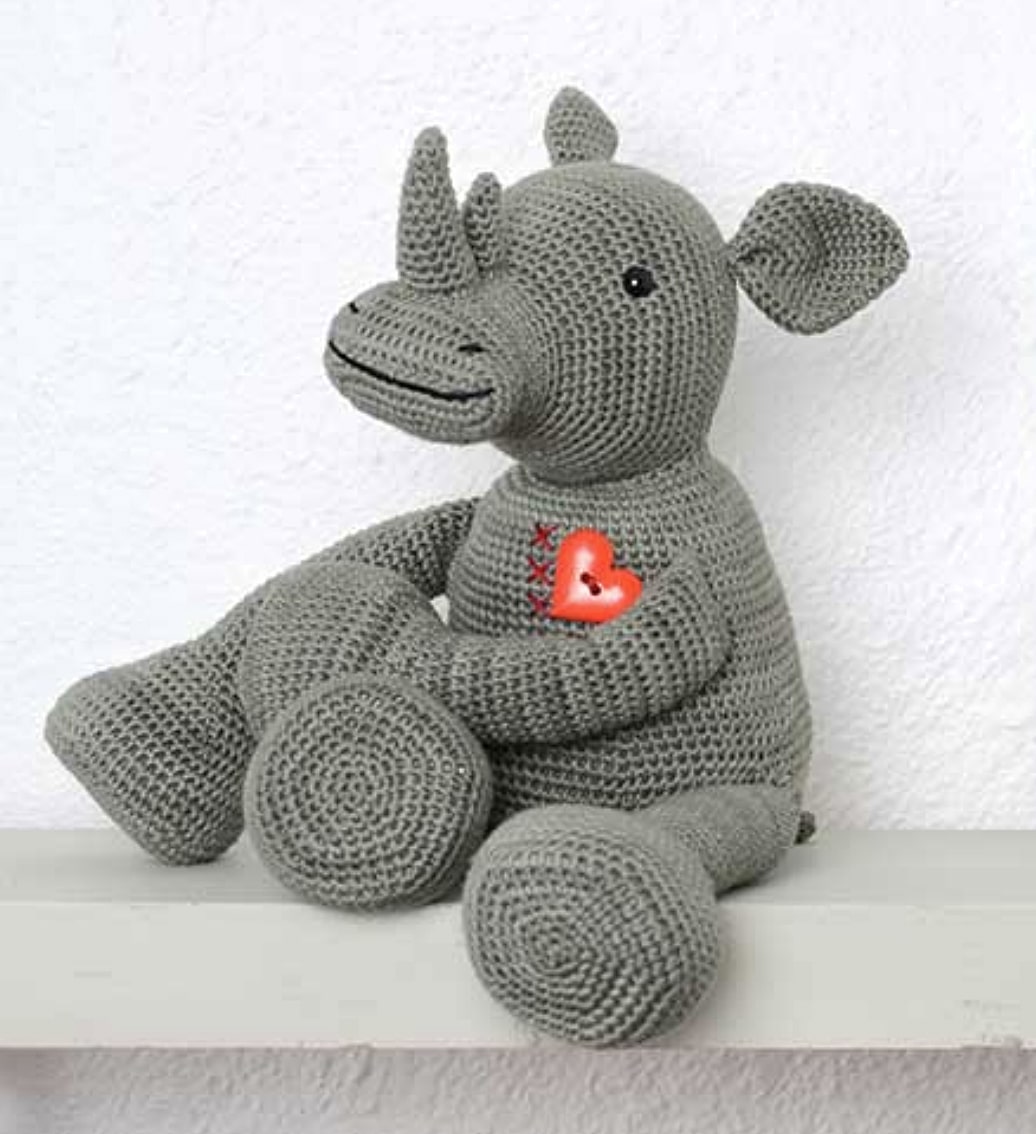
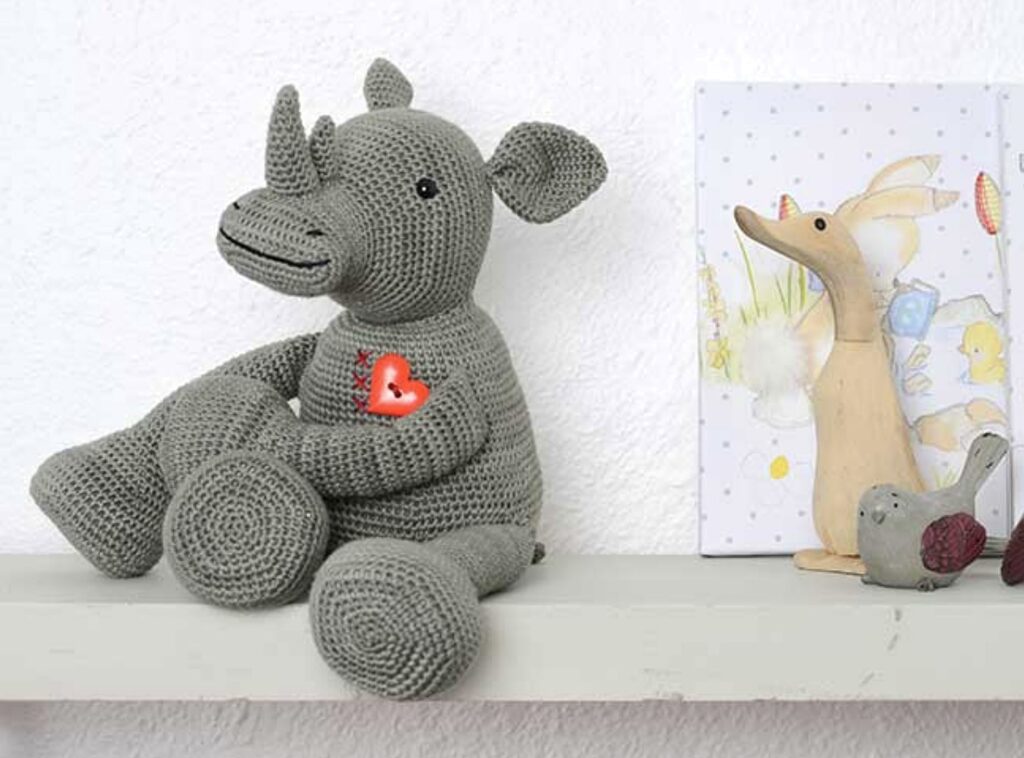
One of the free amigurumi crochet patterns we will share today is the amigurumi rhino, whose photos and design belong to Stephanie Davies. You can learn how to crochet these rhino using the free amigurumi pattern. Thanks to Stephanie Davies (yourfamily.co.za) for this cute rhino.
If you don’t know how to often crochet and needles, read our shares. Start your knitting according to the rate you have according to the shape you will make. Shape your toy by increasing and decreasing the point. Once you weave the shape you want to fill the inside of your toy and look at the pictures to decorate.
Amigurumi cats, amigurumi dolls, amigurumi dogs, amigurumi unicorns, amigurumi lambs, amigurumi dinosaurs, amigurumi foxes, amigurumi bears, amigurumi giraffes, amigurumi pigs, amigurumi penguins, amigurumi panda, amigurumi llama, amigurumi bunny, amigurumi clowns, amigurumi elephants, amigurumi hippos, amigurumi monkeys will not be difficult for you…
Materials
• 4 balls of Vinnis Colour Nikkim 100% Cotton Yarn colour way Slate (540). You can substitute another DK yarn with approximately 119m/50g.
• 3.5mm and 4mm crochet hook, or appropriate size for correct tension.
• One pair of 12mm safety eyes
• 1 safety pin used as a stitch marker
• Black and red embroidery cotton
• One large red heart button
• A cheap micro fibre or hollow fibre filled pillow used as stuffing
• A thin piece of plastic, such as an ice cream container lid, cut into 4 circles with a 6cm diameter
• Tapestry needle
• Scissors
Abbreviations
ch: chain,
ch-sp: chain space,
sl st: slip stitch,
dc: double crochet,
fdc: foundationless double crochet,
inc: increase,
inc3: increase three,
invd: invisible decrease,
invd3: invisible decrease three,
yo: yarn over hook,
lp: loop,
ins: insert
inc: increase,
flp: front loop,
blp: back loop, *: repeat instructions from asterisk as directed
AMIGURUMI RHINO CROCHET FREE PATTERN
Special stitches
increase three (inc3): place three double crochets into the stitch to be increased
invisible decrease three (invd3): pick up the front loops of the three stitches to be decreased and complete the decrease as per normal invisible decrease. To make the Amigurumi Rhino Worked entirely in spirals.
The head, starting at the nose
round 1: 10 fdc, do not turn. (10st)
round 2: 2dc (inc) into the bottom (ch part) of the last fdc made, 8dc across, 2dc (inc) into the bottom of the first fdc made, 2dc (inc) into the top of the first fdc made, 8dc across, 2dc (inc) into the top of the last fdc made. Pin the safety pin to the last increase made, repeat every round. (24st)
round 3: 2dc in next st (x2), 8dc across, 2dc in next st (x4), 8dc across, 2dc in next st (x2). (32st)
round 4: 2dc in next st (x4), 8dc across, 2dc in next st (x8), 8dc across, 2dc in next st (x4). (48st)
round 5 – 7: 1dc in each st around. (48st)
round 8: 6dc, invd, 8dc, invd, 12dc, invd, 8dc, invd, 6dc. (44st)
round 9: 5dc, invd, 8dc, invd, 10dc, invd, 8dc, invd, 5dc. (40st)
round 10: 4dc, invd, 8dc, invd, 8dc, invd, 8dc, invd, 4dc. (36st)
round 11: 3dc, invd, 8dc, invd, 6dc, invd, 8dc, invd, 3dc. (32st)
round 12 – 16: 1dc in each st around (32st)
round 17: *3dc, inc *x8 (40st)
round 18: 1dc in each st around (40st)
round 19: *4dc, inc *x8 (48st)
round 20: 1dc in each st around (48st)
round 21: *5dc, inc *x8 (56st)
round 22: 1dc in each st around (56st)
round 23: *6dc, inc *x8 (64st)
round 24: 1dc in each st around (64st)
round 25: *7dc, inc *x8 (72st)
round 26 – 40: 1 dc in each st around (72st) Insert the safety eyes on the 5th and 8th increase stitch of round 25, or as close to those stitches in order for the eyes to be in the correct position.
round 41: 12dc, 15fdc (use a .5mm smaller hook to keep the stitches tight). Skip 15dc, join fdc to 27th st, 45dc to finish round. (72st)
round 42 – 43: 1dc in each st around (72st)
round 44: *7dc, invd *x8 (64st)
round 45: 1dc in each st around (64st)
round 46: *6dc, invd *x8 (56st)
round 47: 1dc in each st around (56st)
round 48: *5dc, invd *x8 (48st)
round 49: 1dc in each st around (48st)
round 50: *4dc, invd *x8 (40st)
round 51: *3dc, invd *x8 (32st)
round 52: *2dc, invd *x8 (24st)
round 53: *1dc, invd *x8 (16st)
round 54: *invd *x8 (8st)
Cut yarn with enough length to weave in the end.
Stuff the head.
The body, starting at the neck
Attach yarn to the first fdc of the neck opening in the head with a sl-st
round 1: 1dc in each st around (30st) Attach the safety to the last dc and move each round.
round 2: inc in every st (60st)
round 3: *9dc, inc *x6 (66st)
round 4 – 8: 1dc in each st around (66st))
round 9: *10dc, inc *x6 (72st)
round 10 – 19: 1dc in each st around (72st)
round 20: *11dc, inc *x6 (78st)
round 21: 1dc in each st around (78st)
round 22: *12dc, inc *x6 (84st)
round 23: 1dc in each st around (84st)
round 24: *13dc, inc *x6 (90st)
round 25: 1dc in each st around (90st)
round 26: *13dc, invd, *x6 (84st)
round 27: 1dc in each st around (84st)
round 28: *12dc, invd, *x6 (78st)
round 29: 1dc in each st around (78st)
round 30: *11dc, invd, *x6 (72st)
round 31: 1dc in each st around (72st)
round 32: *10dc, invd, *x6 (66st)
round 33: 1dc in each st around (66st)
Stuff the body.
round 34: *9dc, invd, *x6 (60st)
round 35: *8dc, invd, *x6 (54st)
round 36: *7dc, invd, *x6 (48st)
round 37: *6dc, invd, *x6 (42st)
round 38: *5dc, invd, *x6 (36st)
round 39: *4dc, invd, *x6 (30st)
Check the firmness of the body, if it is a bit too soft add more stuffing.
round 40: *3dc, invd, *x6 (24st)
round 41: *2dc, invd, *x6 (18st)
round 42: *1dc, invd, *x6 (12st)
round 43: *invd, *x6 (6st)
Cut yarn with enough length to weave in ends.
Legs, make four
Make a magic ring
round 1: 5dc into magic ring (5st) attach the safety pin ti the last dc and move each round.
round 2: *inc, *x5 (10st)
round 3: *1dc, inc, *x5 (15st)
round 4: *2dc, inc, *x5 (20st7
round5:*3dc, inc, *x5(25st)
round6:*4dc, inc, *x5(30st)
round7:*5dc, inc, *x5(35st)
round8:*6dc, inc, *x5(40st)
round9:*7dc, inc, *x5(45st)
round10:*8dc, inc, *x5(50st)
round11-15:1dc ineachstaround(50st) Insert the plastic disc and stuff the foot.
round 16: *8dc, invd, *x5 (45st)
round 17: *7dc, invd, *x5 (40st)
round 18: *6dc, invd, *x5 (35st)
round 19: *5dc, invd, *x5 (30st)
round 20: *4dc, invd, * x5 (25st)
round 21: *3dc, invd, *x5 (20st)
round 22 – 47: 1dc in each st around (20st)
Cut yarn with enough lengthtosew intheend.
Stuff loosely.
Tail
Make a magic ring
round 1: 7dc into magic ring (7st)
round 2: 6dc, inc (8st)
round 3: 3dc, inc, 4dc (9st)
round 4: 5dc, inc, 3dc (10st)
round 5: 1dc, inc, 8dc (11st)
round 6: 7dc, inc, 3dc (12st)
round 7: 1dc in each st around (12st)
Cut yarn with enough length to sew in the end.
Do not stuff.
Small horn
Make one
Make a magic ring
round 1: 4dc into magic ring (4st)
round 2: inc, 3dc (5st)
round 3: 1dc, inc, 3dc (6st)
round 4: 2dc, inc, 3dc (7st)
round 5: 3dc, inc, 3dc (8st)
round 6: 4dc, inc, 3dc (9st)
round 7: 5dc, inc, 3dc (10st)
round 8 – 9: 1dc in each st around (10st)
Cut yarn with enough length to sew in end.
Stuff firmly.
Large horn
Make one (make two in Mahogany for Springbok)
Make a magic ring
round 1: 4dc into magic ring (4st)
round 2: inc, 3dc (5st)
round 3: 1dc, inc, 3dc (6st)
round 4: 2dc, inc, 3dc (7st)
round 5: 3dc, inc, 3dc (8st)
round 6: 4dc, inc, 3dc (9st)
round 7: 5dc, inc, 3dc (10st)
round 8: 6dc, inc, 3dc (11st)
round 9: 7dc, inc, 3dc (12st)
round 10: 8dc, inc, 3dc (13st)
round 11: 9dc, inc, 3dc (14st)
round 12 – 13: 1dc in each st around (14st)
Cut yarn with enough length to sew in end.
Stuff firmly
Ears
Make two (make two in Sand for Springbok)
6ch, sl-st closed
round 1: 10dc into chain ring (10st)
round 2: 2dc, inc3, 4dc, inc3, 2dc (14st)
round 3: 3dc, inc3, 6dc, inc3, 3dc (18st)
round 4: 4dc, inc3, 8dc, inc3, 4dc (22st)
round 5: 5dc, inc3, 10dc, inc3, 5dc (26st)
round 6: 6dc, inc3, 12dc, inc3, 6dc (30st)
round 7: 7dc, inc3, 14dc, inc3, 7dc (34st)
round 8: 8dc, inc3, 16dc, inc3, 6dc (36st)
round 9: invd3, 16dc, invd3, 15dc (33st)
round 10: invd3, 14dc, invd3, 13dc (29st)
round 11: invd3, 12dc, invd3, 11dc (25st)
round 12: invd3, 10dc, invd3, 9dc (21st)
round 13: invd3, 8dc, invd3, 7dc (17st)
round 14: invd3, 6dc, invd3, 5dc (13st)
round 15: invd3, 4dc, invd3, 3dc (9st)
round 16: invd3, 2dc, invd3, 1dc (5st)
Cut yarn with enough length to sew in end.
Do not stuff.
To assemble the amigurumi rhino
The ears
Attach a length of yarn to the bottom of the ear and sew the first two rounds up to form the base of the ear. Connect the ears in line with the eyes, about 9 rounds further back.
The horns
Attach the large horn in the centre the nose from round 8-12 and the small horn directly behind that.
The mouth
Insert a length of yarn into the third round of the mouth and shape the mouth by weaving the yarn through the ‘v’ part of the stitches in the second round, alternating between one stitch above and one below the fdc. Sew in the end.
Thread a length of black embroidery cotton onto the tapestry needle and knot the ends together, doubling the cotton. Insert the needle into the wide part of the mouth on round 4 and shape the mouth across the width. To create a bit of a smile secure the middle of the mouth with a stitch slightly lower than the sides of the mouth. Carefully sew in the end so it is not visible between the grey stitches.
The nostrils
Place the nostrils two rounds in front of the big horn and about five stitches away from the edge of the horn. Create a diagonal line starting in one round and moving three stitches across and into the next round.
The legs
Attach the front legs about 7 rounds below the neck and in line with the eyes.
The legs should be attached vertically as this makes them hang better.
The back legs are attached in line with the front legs about 9 rounds further down.
The tail
Attach the tail to the back of the body in the centre, about 12 or 13 rounds from the bottom.
The heart and Xs
Use the red embroidery cotton to secure the heart in line with the left front leg and make three Xs next to the inside of the heart. The Xs should move three stitches across and down in either direction. Sew in the end under the heart, so the red is not visible among the grey.